
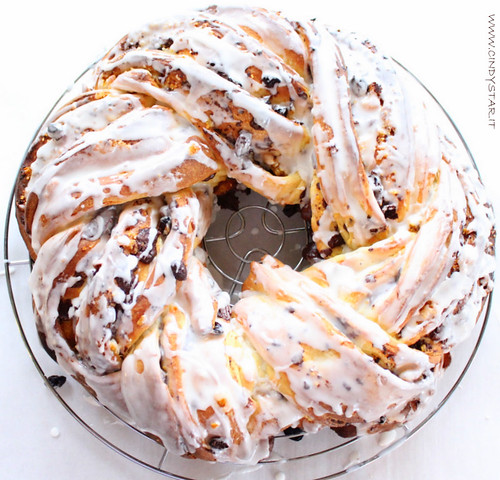
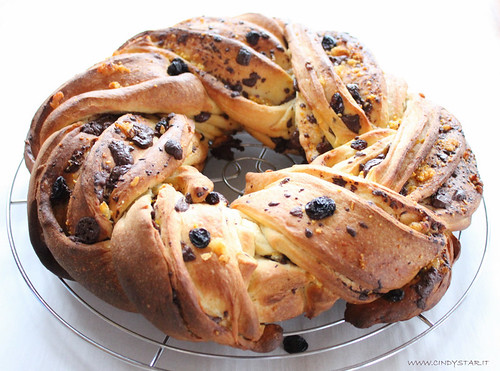
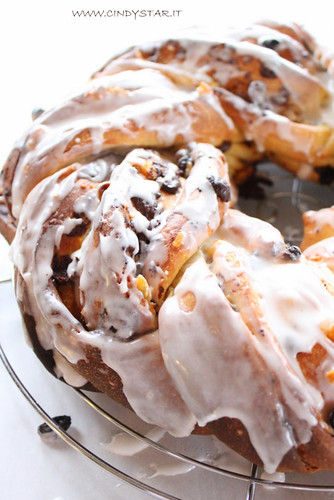
Torta Angelica - BBD # 37
Non mi ero accorta, ma oggi è l'ultimo giorno di febbraio e c'è in scadenza il secondo contest di About Food, Ricette per un Pic nic. Confesso che avevo pensato di mandare una ricetta già pubblicata perchè sono presa sempre da mille cose ed impegni, anche perchè, a dir la verità, avevo pensato solo al salato, e con questo tempo uggioso il pensiero di cucinare qualcosa per un pic-nic mi faceva ridere e sotto sotto anche quasi incavolare (con la timida, e per fortuna regressa subito, nevicata di ieri mattina, poi!). Ma proprio perchè ieri era così brutto, ed era una tranquilla domenica a casa (mentre il programma avrebbe previsto una gita a Venezia per il Carnevale ...), ho avuto tempo di sfornare questa bella torta per il Bread Baking Day (l'evento mensile creato da Zorra più di 3 anni fa e dedicato a tutti gli appassionati di impasti e lievitati) di questo mese, e avendone pappata più di una fetta, riconfermando appieno la sua bontà e sofficità, ho concluso che sarebbe stata perfetta anche su una bella tovaglia a quadri stesa su una bel prato verde, all'ombra di una bella quercia secolare, con tante margheritine intorno a farci compagnia! La buona riuscita di questa ricetta è dovuta alla maestria delle mitiche Valeria e Margherita, a cui tanto devo di quello che ho imparato e per le quali avrò sempre un'ammirazione esagerata. Quest'Angelica era fra le ricette del primo corso da me seguito, nell'ottobre del 2006, ed ho provato una certa emozione nel rileggere gli appunti e le note prese allora, quando ancora certi movimenti nell'impastare e certe accortezze mi suonavano strane e non facevano parte del mio curriculum panettiero.
Lievitino:
135 g farina di forza (manitoba)
13 g di lievito di birra
75 g di acqua
In una ciotola piccola fare la fontana con la farina, mettere l’acqua al centro e sbriciolarci il lievito, scioglierlo bene, prendere poi la farina dall’interno della fontana e impastare. Lasciar lievitare il panetto fino al raddoppio (circa un'oretta).
Impasto:
Impasto:
400 g di farina di forza
75 g di zucchero
120 g di latte tiepido
3 tuorli
120 g di burro morbido
1 cucchiaino di sale
Farcitura:
Farcitura:
75 g di uva sultanina, ammollata in acqua e rum e asciugata *
75 g di scorza d'arancia candita
50 g di burro fuso
* tengo sempre un vaso di uvetta sultanina nel rum, così è sempre pronta per ogni preparazione
Glassa coprente:
150g di zucchero a velo
1 albume
- In una ciotola grande fare la fontana con la farina, mettere al centro il latte, quindi i tuorli rigorosamente sopra il latte e amalgamare senza prendere farina, poi mettere lo zucchero e amalgamare, quindi il sale prendendo un po’ di farina. Unire poi il burro morbido e battere l’impasto finchè si stacca dalle pareti della ciotola. Per far ciò si impasta con la mano a cucchiaio prendendo la pasta dal fondo e tirandola verso l'alto rovesciandola poi di nuovo nella ciotola (meglio stando seduti con la ciotola sul grembo, come facevano una volta le nostre nonne per impastare).
- Mettere il lievitino sul tagliere, aprirlo come una pizza, metterci l’impasto brioche dentro, richiudere i bordi e iniziare a impastare e a battere finchè i due impasti non saranno ben amalgamati, non si deve vedere nessuna striatura biancastra. Più aria assorbe l'impasto e meglio si sviluppa la lievitazione. Rimettere poi l’impasto in una ciotola leggermente imburrata, schiacciarlo lievemente col palmo della mano (aiuta a far lievitare la pasta più in fretta) e lasciar lievitare in luogo tiepido fino al raddoppio, un’ora abbondante.
- Nell'impastatore: mettere la farina e lo zucchero nella ciotola, iniziando ad impastare a velocità bassa aggiungere il latte con i tuorli sbattuti, il sale e poco alla volta il burro a pezzettini. Quando ben impastato aggiungere anche il lievitino a pezzetti, aumentando leggermente la velocità e lasciando lavorare l'impastatrice finchè ben amalgamato, non si deve vedere nessuna striatura biancastra. Più aria assorbe l'impasto e meglio si sviluppa la lievitazione. Rimettere poi l’impasto in una ciotola leggermente imburrata, schiacciarlo lievemente col palmo della mano (aiuta a far lievitare la pasta più in fretta) e lasciar lievitare in luogo tiepido fino al raddoppio, un’ora abbondante.
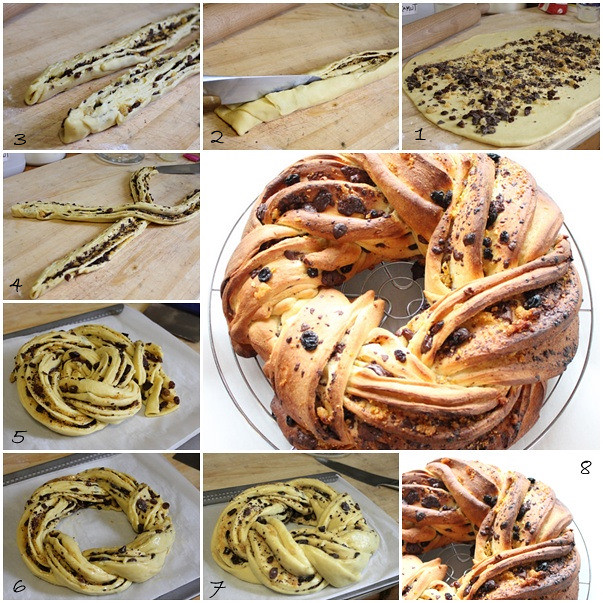
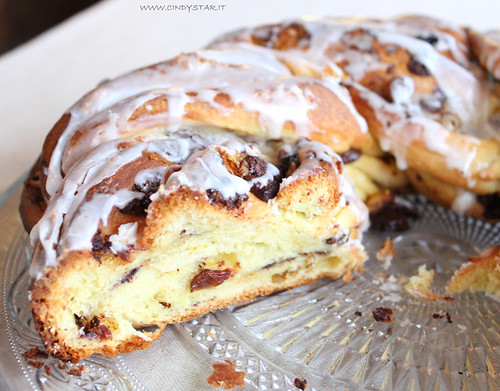
- Rovesciare la pasta sul tavolo infarinato, infarinarla leggermente sopra per far scorrere il matterello e senza lavorarla e senza schiacciarla troppo, stenderla formando un rettangolo di 3 mm di spessore. Pennellare abbondantemente con il burro fuso, farcire con l’uvetta e i canditi di arancia leggermente frullati, così si scioglieranno in cottura (io ho messo metà uvetta e metà gocce di cioccolato). Arrivare a farcire tutti i due lati corti fino al bordo, ma rimanere a 4 cm dal bordo nei lati lunghi (foto 1).
- Arrotolare dal lato più lungo poi, con un coltello infarinato, tagliare a metà per il lato lungo. Ricordarsi di infarinare la lama ogni tanto per evitare che si appiccichi alla pasta. Separare i due lati aiutandosi con il coltello o la spatola di ferro, girarli in modo che la parte tagliata sia rivolta sopra (foto 2 e 3), sovrapporre la parte centrale e formare una treccia tenendo la parte tagliata sempre verso l'alto (foto 4). Avvolgere la treccia a spirale per riuscire a sollevare tutta la pasta con la spatola (foto 5) e adagiarla sopra una teglia dove andrà riaperta e poi richiusa per formare una ciambella (foto 6). Spennellare ancora con burro fuso e far lievitare coperta fin quasi al raddoppio (foto7), circa 40 minuti. Cuocere poi a 200° per 20/25 minuti.
- Preparare la glassa montando l'albume con lo zucchero a velo. Volendo si può fare una glassa più velante usando solo 4 cucchiai di zuccchero a velo (o più semplicemente si può cospargere la torta di zucchero a velo quando fredda). Appena esce dal forno spostare la torta su una gratella e spennellarla con la glassa e lasciarla asciugare.


Angelica Cake
Bangalore Baker of Versatile Vegetarian Kitchen is hosting Bread Baking Day #37, the montly event created d by Zorra more than 3 years ago for "passionate and to-be bread bakers". Theme of the month is about Bread made with sponge or pre-ferment.
Yesterday I was supposed to go to Venice with my 2 youngest boys for the Carnival, but it was raining (and sometimes snowing) all day long, so we stayed at home, me relaxing on the sofa, watching tv, enjoying th fireplace, and baking this cake I learned so many years ago at my first cooking class with charming Simili sisters. Well, we had a very nice teatime alltogether and this morning there were only few crumbs left!
- Arrotolare dal lato più lungo poi, con un coltello infarinato, tagliare a metà per il lato lungo. Ricordarsi di infarinare la lama ogni tanto per evitare che si appiccichi alla pasta. Separare i due lati aiutandosi con il coltello o la spatola di ferro, girarli in modo che la parte tagliata sia rivolta sopra (foto 2 e 3), sovrapporre la parte centrale e formare una treccia tenendo la parte tagliata sempre verso l'alto (foto 4). Avvolgere la treccia a spirale per riuscire a sollevare tutta la pasta con la spatola (foto 5) e adagiarla sopra una teglia dove andrà riaperta e poi richiusa per formare una ciambella (foto 6). Spennellare ancora con burro fuso e far lievitare coperta fin quasi al raddoppio (foto7), circa 40 minuti. Cuocere poi a 200° per 20/25 minuti.
- Preparare la glassa montando l'albume con lo zucchero a velo. Volendo si può fare una glassa più velante usando solo 4 cucchiai di zuccchero a velo (o più semplicemente si può cospargere la torta di zucchero a velo quando fredda). Appena esce dal forno spostare la torta su una gratella e spennellarla con la glassa e lasciarla asciugare.
Qui la ricetta passo passo

Angelica Cake
Bangalore Baker of Versatile Vegetarian Kitchen is hosting Bread Baking Day #37, the montly event created d by Zorra more than 3 years ago for "passionate and to-be bread bakers". Theme of the month is about Bread made with sponge or pre-ferment.
Yesterday I was supposed to go to Venice with my 2 youngest boys for the Carnival, but it was raining (and sometimes snowing) all day long, so we stayed at home, me relaxing on the sofa, watching tv, enjoying th fireplace, and baking this cake I learned so many years ago at my first cooking class with charming Simili sisters. Well, we had a very nice teatime alltogether and this morning there were only few crumbs left!
Sponge:
135 g Manitoba flour
13 g fresh yeast
75 g lukewarm water
Pour the flour into a small bowl, make a weel, pour water in the middle and dissolve yeast in it, then combine with the flour and shortly and knead. Cover the bowl with plastic film and let the dough rise until doubled (about an hour).
Dough:
400 g Manitoba flour
75 g sugar
120 g warm milk
3 egg yolks
120 g soft butter
1 teaspoon salt
400 g Manitoba flour
75 g sugar
120 g warm milk
3 egg yolks
120 g soft butter
1 teaspoon salt
Stuffing:
75 g raisins, soaked in rum and water and dried *
75 g candied orange zest
50 g melted butter
75 g raisins, soaked in rum and water and dried *
75 g candied orange zest
50 g melted butter
* I always keep a jar of raisins in rum infusion, so it's always ready for any preparation
Glaze:
150 g icing sugar
1 egg white
150 g icing sugar
1 egg white
- Place sponge on the working surface, roll it out as a pizza, put the brioche dough inside, wrap the edges onto and start kneading and beating until the two are well amalgamated, you should not see any white streaks. The more air the dough absorbs the better it will rise. Replace then the dough into a lightly buttered bowl, crush lightly with the palm of your hand (this helps the dough rise faster) and let rest in warm place until doubled, about an hour or a little more.
- In the stand-mixer: pour flour and sugar in the bowl and start kneading at low speed, add milk and beaten egg yolks, salt, and gradually the butter cut into small pieces. Knead well and then add the chopped sponge, slightly increasing the speed and let the mixer work until the two doughs are well amalgamated, you should not see any white streaks. The more air the dough absorbs the better it will rise. Replace then the dough into a lightly buttered bowl, crush lightly with the palm of your hand (this helps the dough rise faster) and let rest in warm place until doubled, about an hour or a little more.
- Turn out the dough onto the floured working surface, sprinkle a little flour and roll it out, without squeezing too much, in a rectangle 3 mm thick. Brush thoroughly with melted butter, spread over raisins and candied oranges (as my boys don't like candied pieces I blend them in the mixer so they will melt during cooking and also I put half raisins and half chocolate chips). Spread all over but remain at 4 cm from the edge of the long sides (pic 1).
- Roll up starting from a long side then, with a floured knife, cut in half following the long side. Remember to flour the knife occasionally to prevent sticking to the pastry. Divide the two sides with the help of a knife or alluminium spatula, turn them with the cut side up (pic 2 and 3), then shape into a braid (starting from the middle) always keeping the cut side facing up (pic 4). Wrap the braid into a spiral to be able to place it over a baking pan (pic 5), then pull out agian and shape into a donut (pic 6). Brush again with melted butter, cover and let rise until almost doubled (pic 7), about 40 minutes. Bake at 200° for 20/25 minutes, if it gets brown too quicky cover with alluminium paper.
- Prepare the glaze whisking egg white with icing sugar. For a lighter glaze just use only 4 tablespoons of icing sugar (or you can simply sprinkle the cake with icing sugar when cooled). When out of the oven place the cake on a wire rack and brush immediately with glaze and let cool.
This recipe is also my entry to this week Susan's YeastSpotting


19 commenti:
This looks delicious. It's commonly called a "coffee cake" in the U.S. because it's the perfect accompaniment to cup of coffee.
E' meraviglioso... che colazione mi farei con questa ciambella... la devo rifare ...
intanto continuo a seguirti
a presto...vieni a trovarmi quando vuoi
This looks great. I loved the way the logs were slashed before twisting together. Thanks for the entry.
...che meraviglia!!! Questa è una di quelle cose che mi ripropongo di fare da anni, ma che poi non realizzo mai...mannaggia a me!
Buona giornata Cy!
è bellissima, mi sa che io non sono abbastanza brava per impastare qs meraviglia ma te la invidio molto, prima o poi ci provo!
ma che spettacolo di dolce.....sei davvero bravissima!
un abbraccio
davvero paradisiaca! complimenti, bellissime foto! :-D
Buona e bellissima, la devo rifare, sì, sì.
Da tempo desidero fare l'Angelica delle sorelle Simili, direi che con la tua meravigliosa spiegazione non posso rimandare! Grazie anche per le belle foto Un abbraccio Lulù
Thanks, Joan, so I will change the title to Angelica Coffe Cake! :-)
Manu, grazie, infatti quella avanzata dal tè la mattina dopo è letteralmente sparita a colazione!
Champa, so while baking they enlarge and give a nice twisted and layered surface to the cake! I suppose you can do with any dough, even a bread, maybe you could put some herb oil or butter inside.
Simo, dai, fatti prendere dal coraggio e via, merita davvero! poi le foto del procedimento aiutano, sul link di cook sono molto più dettagliate.
Passiflora, leggi la mia risposta a Simo, vale anche per te, e se hai bisogno di aito sono qua, x mail/skype/commenti.
Daisy, grazie, un abbraccione anche a te!
AmoreVero, grazie, sto cercando di imparare a fare le foto, stasera sono di uscita fotografica, speeriamo "che me la cavo"!
Moki, sì, sì, sì, zì, zì, zì! :-)
Caralulù, voglio venire a gustarmela presto anche da te, allora!
Fantastica, Cinzia.
Ottima veramente ma... non la farò più: una volta che l'ho fatta l'ho lasciata freddare in cucina, dov'era Claudia e... come per magia quando sono tornato la ciambella era dimezzata :-D
quanto sei brava!!!!
mi piace moltissimo la vedo bene anche per la Pasqua :)
complimenti per le spiegazioni un gran bel lavoro complimenti
Jajo, hai sbagliato tattica ... la magia la dovevi anticipare tu, lasciandone già solo mezza torta ... e poi come d'incanto farla riapparire intera! ... e se la rifacessimo insieme? ... a tutta birra ci vuole un altro grande fornello!
Pat, grazie, i lievitati sono la mia passione! ed hai ragione, con quella glassa fa molto primavera e Pasqua, sai che bella colazione mentre si aprono le uova?
Günther, grazie,mi piace essere precisa quando si può perchè aiuta molto poi nella realizzazione,anche i passaggi più timorosi sono poi più facilmente accettabili.
Una fettazza per tutti e buonissima colazione!
Altro che pic-nic questa ciambella sapientemente intrecciata è un capolavoro da gustare ogni volta che ci vogliamo viziare con tanto amore e gusto :)
Bacio e buona cena
diariodicucina.blogspot.com
Questa ciambella è davvero un capolavoro, complimenti!
Oh so gorgeous! *sigh* Now I must add this one to the try out list along with the beautiful Kranz you did last year about this time too! ☺
This is gorgeous! Brava! Love the tip about keeping raisins in rum as a pantry item.. this will certainly encourage more recipes like this. ; )
Letizia, infatti è stata una coccola in una giornata uggiosa, ma qua vorrebberoessere coccolati tutti i giorni!
Marina, grazie!
H:Baker, what a honor, you remember my kranz from last year! and both recipes belong to those fab baker ladies from Bologna, so gentle, so lovely! the best guarantee for baking, put a red sign on your try out list!
Manju, thanks, I should add that raisins in rum are good also in savory dishes, you can use withpout rinsing them, alchol will evaporate quickly once at the air.
Posta un commento
grazie della visita e gentilmente firma sempre i tuoi commenti!
thanks for passing by and please sign up your comments!