30 giugno 2010

Pane con zucca, mirtilli e noci - BBD # 31


scroll down for English version

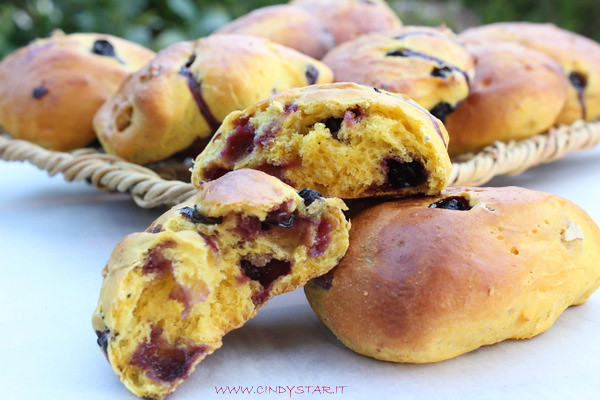
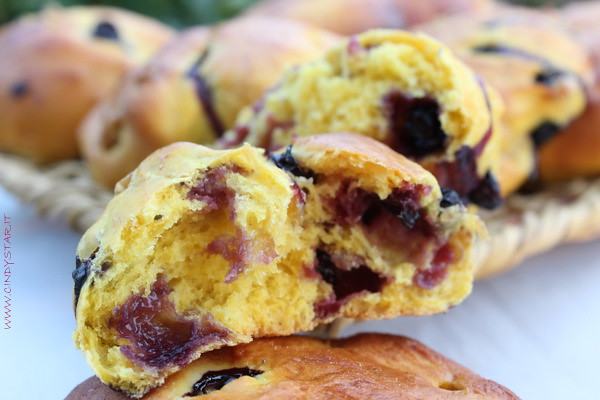
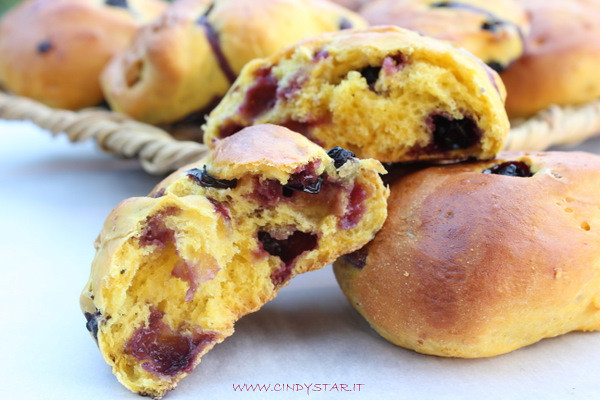
Un pane morbido, colorato, fantasioso e saporito: un mix vincente che mi ha subito conquistato non appena letti gli ingredienti! Può essere fatto a pagnotta unica o diviso in tanti picoli panini dalla forma irregolare, perfetto per un Brunch domenicale, anche se io l'ho trovato delizioso con i formaggi freschi morbidi.
La ricetta è tratta dal libro Pane di Linda Collister.


pane zucca-mirtilli-noci

Ingredienti:

700 g di zucca
40 g di burro
2 cucchiaini di sale
40 g di zucchero semolato biondo
15 g di lievito fresco
1 cucchiaio di acqua tiepida
350 g di farina 0
una macinata di pepe
una bella macinata di noce moscata
100 g di mirtilli freschi
50 g di noci o noci Pecan a pezzetti
un uovo sbattuto con un pizzico di sale per pennellare


- Tagliare la zucca a pezzetti, eliminare buccia e semi e tagliarla a quadrotti. Prenderne 400 g e cuocerla nel cestello a vapore o in pentola a pressione o nel microonde o in forno (avvolta nell'alluminio) finchè morbida. Raffreddare leggermente e poi mescolare in un mixer con il burro, il sale e lo zucchero per ottenere una crema omogenea e lasciare intiepidire.
- Sbriciolare il lievito in una ciotolina, aggiungere l'acqua e mescolare bene.
- Mettere la farina e le spezie in una grande ciotola, fare la fontana al centro e metterci il composto di zucca e il lievito. Iniziare ad incorporare la farina fino ad ottenere un impasto morbido ma non appiccicoso. In base al tipo di zucca usata potrebbe essere necessario aggiungere un goccio di acqua in più, ma sempre un cucchiaio alla volta, se l'impasto si presenta troppo secco, oppure un pochino di farina in più se troppo umido e appiccicoso.
- Trasferire bene sul piano di lavoro infarinato e lavorare l'impasto per 5 minuti. Rimettere in una ciotola leggermente unta, coprire con pellicola e lasciare lievitare a temperatura ambiente fino al raddoppio, circa un'ora.
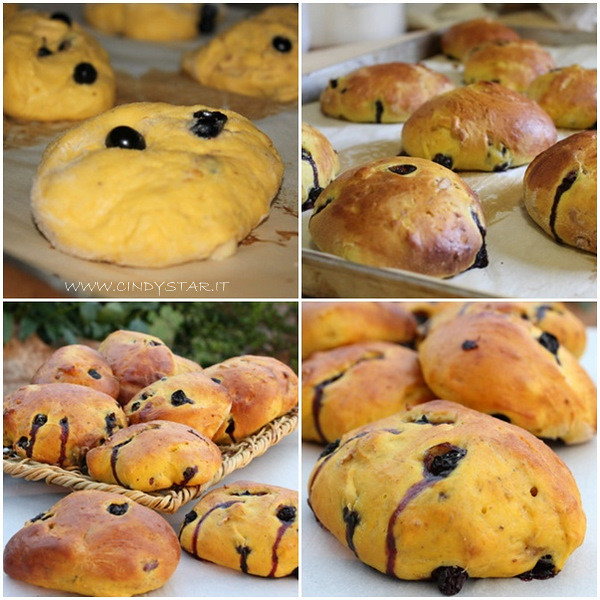
- Trasferire l'impasto sul piano di lavoro e delicatamente aggiungere noci e mirtilli. Se si decide per una pagnotta dare una forma rotonda all'impasto e mettere sulla teglia a lievitare. Altrimenti dividere l'impasto in 12 pezzi e fare delle palline dalla forma irregolare. Mettere sulla teglia ricoperta di carta forno e lasciare lievitare coperti fino al raddoppio, circa 30 minuti per i panini e 45 minuti per la pagnotta.
- Pagnotta: premere il pollice al centro della pagnotta lievitata per fare un piccolo buco, pennellare con l'uovo sbattuto e con un coltello affilato incidere in più punti per farla assomigliare ad una zucca. Cuocere in forno caldo a 200° finchè bella dorata, circa 35 minuti: è pronta quando suona vuota se picchiettata sul fondo. Lasciare raffreddare su una griglia di metallo.
- Panini: pennellare con l'uovo sbattuto e cuocere in forno caldo a 200° per circa 15/20 minuti. Lasciare raffreddare su una griglia di metallo.


pane zucca-mirtilli-noci - bbd 31

pane zucca-mirtilli-noci


Pumpkin Bread with Nuts and Blueberries


It's time to bake again for Bread Baking Day # 31, this month celebrating 3rd Anniversary!
This special edition is hosted by Zorra, our charming founder, and the theme she has chosen is Breads with Nuts: Hazelnuts, Peanuts, Walnuts, Almonds and Brazil nuts, Pistachios, Pecans, Macadamia Nuts, Pine Nuts, Coconut, hemp seeds ... whatever nutty our baking fantasy will go!
Thank you, Zorra, for creating and carrying on this lovely event, it's my favorite, and wish you a long baking time ahead!
I got this recipe from Linda Collister book Bread, it was love at first sight when I read the ingredients!


pane zucca-mirtilli-noci


Ingredients:

700 g pumpkin
40 g butter
2 teaspoons salt
40 g light cane sugar
15 g fresh yeast
1 tablespoon warm water
350 g flour
half tsp freshly ground jamaican pepper
half tsp grated nutmeg
100 g fresh blueberries
50 g chopped walnuts or pecans
a beaten egg with a pinch of salt for brushing

- Cut the pumpkin into pieces, peel and remove seeds and cut into squares. Take 400 g and cook in the steam drum or in a pressure cooker or microwave or oven (wrapped in aluminum) until soft. Cool slightly, then mix in a blender with butter, salt and sugar to a smooth cream and let cool.
- Crumble the yeast into a small bowl, add water and mix well.
- Put the flour and spices in a large bowl, make a well in the middle and pour into the mixture of pumpkin and yeast. Begin to incorporate the flour until the mixture is soft but not sticky. Depending on the type of pumpkin used you may need a little more water, but always a tablespoon at a time, if the dough appears too dry, or a little more flour if too wet and sticky.
- Place the dough onto a floured work surface and work it for 5 minutes. Put in a lightly greased bowl, cover with plastic wrap and let rise at room temperature until doubled, about an hour.
- Transfer the dough onto the work surface again and gently add walnuts and cranberries. If you decide for a single loaf, shape the dough into a round one and place on the pan (covered with parchment paper) to rise. Otherwise, divide the dough into 12 pieces and make balls of irregular shape. Place on baking tray covered with parchment paper and let rise covered until doubled, about 30 minutes for buns and 45 minutes for single loaf.
- Loaf: press your thumb in the middle of leavened bread to make a small hole, brush with beaten egg and with a sharp knife make some incisions to resemble a pumpkin. Bake at 200° until golden, about 35 minutes: it is ready when it sounds hollow when spotted on the bottom. Cool on a metal rack.
- Buns: brush with beaten egg and bake in preheated oven at 200° for about 15/20 minutes. Cool on a metal rack.


BBD # 31 Round up

This recipe also goes to Susan's weekly YeastSpotting.
YeastSpotting Round up 7.2.10

La cecina - MLLA 24

La cecina è una specie di focaccia, o meglio torta salata, molto bassa e sottile a base di farina di ceci, tipica della Liguria (dove viene chiamata farinata) e della Toscana. Ma è una preparazione presente anche in altre regioni, a volte portata proprio dagli stessi genovesi, girovaghi e colonizzatori a Gibilterra, immigrati in Uruguay e Argentina.
E' un cibo povero che utilizza pochissimi semplici ingredienti e spesso usato in alternativa al pane. Si abbina con qualsiasi pietanza ma non mancano gli estimatori della cecina pura che la gustano così, con una semplice spolverata di pepe sopra.
C'è una leggenda che racconta la nascita della cecina come un fatto casuale quando la Repubblica Marinara di genova sconfisse quella di Pisa nel 1284. Le navi genovesi (galee), cariche di prigionieri messi a vogare, furono sorprese da una terribile tempesta. Si ribaltarono alcuni barili di olio e dei sacchi di ceci, mescolandosi con l'acqua salata. Dal momento che quelle erano le maggiori provviste sulle navi, si cercò di recuperare il più possibile e furono così servite ai marinai scodelle piene di una specie di purea di ceci e olio. Sperando di migliorarne il sapore e la consistenza, si provò a lasciare le scodelle al sole, che asciugò la mistura in una sorte di frittella. Una volta a terra, i genovesi cercarono di migliorare la ricetta e provarono a cuocere il composto in forno. la cosa fu gradita, nacqua così la prima farinata che, per deridere gli sconfitti, fu chiamata l'oro di Pisa.

cecina - mlla 24

Ingredienti:

250 g di farina di ceci
750 g di acqua
sale
pepe macinato fresco
olio extravergine di oliva
teglia da forno 30x40 cm.

- Mescolare la farina con l'acqua evitando che si formino grumi e salare.
- Lasciare riposare il composto coperto per almeno un paio di ore, girandolo ognitanto in modo che la farina non si depositi sul fondo.
- Sarebbe meglio usare una teglia di rame stagnato da forno, ma in mancanza va bene anche una antiaderente o una in alluminio rinforzato monouso. Ungere abbondantemente la teglia, versarci il composto (deve essere uno strato molto sottile, mezzo centimetro), dare una mescolata in modo che l'olio si mescoli con la pastella e infornare in forno ben caldo, anche 220/230° e cuocere finchè presenta una bella crosticina dorata, 20/30 minuti. Per una cottura uniforme girare la teglia a metà cottura.
- Appena sfornata cospargere con una bella macinata di pepe, tagliare a fette e servire.

Cecìna

Cecina is a sort of savory pancake, very flat, thin and crisp, made with chickpea flour. It's very popular in Liguria (where is called farinata) and Tuscany. But it is also present in other regions, sometimes brought there by Genoese travelers, or colonizers like in Gibraltar, or still immigrants in Uruguay and Argentina. It's a poor food that uses a few simple ingredients and often used as an alternative to bread. It goes with any dish but most fans likes it pure, with a simple dusting of pepper.
There is a legend about the birth of cecina, something like a coincidence when the Maritime Republic of Genoa defeated Pisa in 1284. Genoese ships, loaded with rowing prisoners, were surprised by a terrible storm. Some barrels of oil and bags of chickpeas reversed, and got mixed with salt water. Since these were the major stores on the ships, they tried to recover as much as possible (but it's also proverbial Genoese stinginess!): sailors were served with bowls filled with a sort of mashed chickpeas and olive oil. Hoping to improve the taste and texture, they tried to leave the bowls in the sun, which dried the mixture into a sort of pancake. Once ashore, the Genoese people tried to improve the recipe and cooked the mixture in the oven. It was well appreciated, and the first cecina was born! To mock the losers, they called it the gold of Pisa.

This recipe goes to Diana of A little bit of Spain in Iowa who is hosting MLLA # 24.


Ingredients:

250 g chickpea flour
750 g of water
salt
fresh ground pepper
extra virgin olive oil
baking pan about 30x40 cm.

cecina

- Mix the flour with water and stir well to avoid lumps, add salt.
- Leave the mixture covered for at least a couple of hours, stirring sometime so that the flour iwon't fall to the bottom.
- It would be better to use a tin-plated copper baking-pan, but it is fine with a no-stick one or a disposable aluminum one. Grease the pan thoroughly, pour the mixture (must be very thin, half a centimeter), give a stir to mix the oil with the batter and bake in hot oven, 220/230° until golden brown, 20/30 minutes. Better to turn the pan halfway through cooking.
- Out of the oven, garnish with a nice sprinkle of pepper, cut into slices and serve.

28 giugno 2010

June DB Challenge - Pavlova al Cioccolato


English recipe here


Questo mese la ricetta scelta da Dawn di Doable and Delicious per la sfida delle Daring Bakers è la Pavlova al Cioccolato con Mousse di Mascarpone al Cioccolato tratta dal libro "Chocolate Epiphany" di Francois Payard.
Ho già fatto una Pavlova precedentemente e mi piacciono moltissimo le meringhe, e da quando ho imparato a cuocerle bene seguendo le indicazioni di Santin mi diverto troppo a farle (e poi i miei ragazzi ne sono ghiottissimi!) ... per cui la ricetta di questa sfida sembrava fatta apposta per noi!
Ne ho approfittato e l'ho fatta subito a inizio giugno in occasione di un doppio festeggiamento: il compleanno di Mamo, l'ultimo della nostra cucciolata, e quello di Ivan, un caro amico che avrebbe spento le candeline il giorno dopo. La mousse di mascarpone al cioccolato è strepitosa, la meringa bella croccante, l'unico "difetto" è la grande quantità di crema inglese che da la ricetta, secondo me meglio dimezzare la dose, serve solo come guarnizione e quindi ne basta poca.

chocolate pavlova


C'è una sorta di polemica tra Australia e Nuova Zelanda circa la paternità del dolce, dedicato ad Anna Pavlova, rivendicata da entrambe le nazioni e scelto come dolce nazionale delle due.
La Nuova Zelanda sostiene che il dolce sia stato inventato quando la ballerina si fermò a Wellington durante il suo tour mondiale nel 1926. L'Australia sostiene che l'inventore fosse uno chef di Perth che dedicò questo dolce alla ballerina nel 1929 , sempre in occasione del suo tour. Comunque sia, la grande ballerina ha conquistato i cuori e i palati di più chefs, che ancora le rendono onore in ogni Pavlova offerta!

mamo 12


Si può utilizzare succo d'arancia al posto del Grand Marnier e omettere la sambuca nella crema al mascarpone per la versione analcolica.
La ricetta può essere eseguita anche tutta in un giorno, osservando i vari tempi per i diversi passaggi:
- mentre le meringhe cuociono si può preparare la crema inglese (circa 15 minuti).
- mentre la crema inglese si raffredda, si può preparare la mousse di mascarpone al cioccolato (circa 15 minuti).
- se si fa la crema inglese il giorno prima, si dovrebbe completare il dolce il dolce in circa 2/3 ore, tempo di cottura delle meringhe compreso.


Meringa al cioccolato:
3 albumi grandi
110 grammi di zucchero semolato
30 g di zucchero a velo
30 grammi di cacao in polvere
- Preriscaldare il forno a 95º. Foderare due teglie con carta forno.
- Mettere gli albumi in una ciotola e montare con la frusta elettrica. Quando quasi ben montati aumentare la velocità e via via aggiungere circa 1 cucchiaio di zucchero semolato alla volta fino ad esaurimento. (i bianchi devono così essere ben essere sodi ma non asciutti).
- Setacciare lo zucchero a velo e il cacao sopra gli albumi e delicatamente amalgamare con una spatola. Sembreranno riluttanti all'inizio ma poi piano piano il composto si unirà.
- Riempire una tasca da pasticcere con la meringa e distribuirla sulla carta forno in qualunque forma si voglia. In alternativa, si può disporre a cucchiaiate e livellare poi con il dorso del cucchiaio.
- Cuocere in forno per 2/3 ore fino a quando le meringhe diventano asciutte e croccanti. Raffreddare e conservare in un contenitore ermetico per massimo 3 giorni. 

mini chocolate pavlova


Mousse di Mascarpone al Cioccolato:
355 ml di panna
scorza grattugiata di 1 limone
255 gr di cioccolato 70% tritato
390 gr mascarpone
pizzico di noce moscata
2 cucchiai di Grand Marnier (o succo d'arancia)
- Mettere 120 ml di panna e la scorza di limone in una casseruola e scaldare a fuoco medio-alto. Una volta caldo, aggiungere il cioccolato e mescolare finchè ben sciolto. Trasferire il composto in una ciotola e lasciare raffreddare a temperatura ambiente.
- Mettere il mascarpone, la rimanente panna e la noce moscata in una ciotola. Montare con un frullino a velocità bassa per un minuto, aggiungere il Grand Marnier e continuare a velocità media per pochissimi minuti finchè inizia a fare le punte. Non esagerare altrimenti monta troppo e poi si sfalda e diventa burro.
- Mescolare circa ¼ della crema di mascarpone nel cioccolato, poi aggiungere anche il resto ed amalgamare bene. Riempire una tasca da pasticcere con la mousse e decorare la Pavlova.

bocconcini di pavlova
pesciolini di pavlova
un'idea per dolci serate estive


Crema di mascarpone leggera, per guarnire:
1 ricetta di Crema Inglese
120 ml di mascarpone
2 cucchiai di Sambuca (facoltativo)
120 ml di panna
Preparare la crema inglese. Lentamente aggiungere il mascarpone e la Sambuca poi lasciare raffreddare il composto. Mettere la crema in una ciotola e sbattere con frullino elettrico finchè diventa soffice e corposa. Aggiungere la panna al composto di mascarpone.


Creme Inglese (componente della crema di mascarpone di cui sopra):
235 ml di latte intero
235 ml di panna
1 stecca di vaniglia o 1 cucchiaino di estratto di vaniglia
6 tuorli da uova grandi
75 grammi di zucchero
- In una terrina sbattere insieme i tuorli e lo zucchero finchè la miscela diventa giallo pallido.
- Unire latte, panna e vaniglia in una casseruola e mettere a fuoco medio-alto, portando il composto a ebollizione. Togliere dal fuoco.
- Versare circa ½ tazza di liquido caldo nei tuorli sbattuti, mescolando velocemente con una frusta per evitare che le uova cuociano. Versare il composto nella pentola, aggiungere con la restante panna e mettere sul fuoco a calore medio. Mescolare costantemente con un cucchiaio di legno fino a quando il composto si addensa leggermente e "vela" il dorso del cucchiaio di legno. Non cuocere troppo!
- Togliere il composto dal fuoco e passarla attraverso un setaccio a maglia fine. Coprire e refrigerare fino a quando il composto si presenterà asciutto e completamente raffreddato, circa 2 ore o meglio tutta la notte.


Assemblggio del dolce:
Distribuire la mousse sulla pavlova e condire con la crema di mascarpone.
Spolverare con zucchero a velo e aggiungere frutta fresca a piacere.


pavlova up side down

Pavlova nel bicchiere:

briciole di meringa sul fondo,
mousse di mascarpone al cioccolato,
2 piccole meringhe e una ciliegia sciroppata per guarnire
(bollire le ciliegie in un pochino di acqua e zucchero per pochissimi minuti)


Questa ricetta partecipa alla tappa australiana dell'ABC Mondiale.

June DB Challenge - Chocolate Pavlova


la ricetta in italiano qui

The June 2010 Daring Bakers’ challenge was hosted by Dawn of Doable and Delicious challenged the Daring Bakers’ to make Chocolate Pavlovas and Chocolate Mascarpone Mousse. The challenge recipe is based on a recipe from the book Chocolate Epiphany by Francois Payard.

The recipe is comprised of three parts, four if you include the crème anglaise. You must make the chocolate pavlovas, the mascarpone mousse and the mascarpone cream. You can use orange juice for the Grand Marnier in the mousse if you don’t use alcohol and you can omit the sambuca from the mascarpone cream.
The recipe can be made in one day although there are several steps involved.
- While the pavlovas are baking, the crème anglaise should be made which will take about 15 minutes.
- While it is cooling, the chocolate mascarpone mousse can be made which will take about 15 minutes.
- There will be a bit of a wait time for the mascarpone cream because of the cooling time for the Crème Anglaise.
- If you make the Crème Anglaise the day before, the dessert should take about 2 hours including cooking time for the pavlovas.

chocolate pavlova

I made Pavlova before and I am very fond of Meringues since I finally learned how to bake them properly. So it was quite easy and enjoyable to join the challenge this month.
I first made the Pavlova following the recipe step by step for my youngest son's birthday at the beginning of June, a small one for him and a big one for a dear friend of us celebrating his birthday the day after. All our guests really appreciated thanks very much Dawn for the lovely recipe! I should only halve the crème anglaise amount, think it's too much for drizzling, but anyway was pretty good!

mamo 12


For further information about Pavlova, have a look on Wikipedia’s definition of Pavlova and read The history of Pavlova. A great video on Youtube will show you How to Make Pavlova and another one uses whipped cream instead of the Mascarpone cream.
And don't forget to check out what other Daring Bakers have created for the Challenge!

Chocolate Meringue (for the chocolate Pavlova):
3 large egg whites
½ cup plus 1 tbsp (110 grams) white granulated sugar
¼ cup (30 grams) confectioner’s (icing) sugar
1/3 cup (30 grams) cocoa powder
- Place a rack in the center of the oven and preheat to 200º F (95º C) degrees. Line two baking sheets with silpat or parchment and set aside.
- Put the egg whites in a bowl and whip until soft peaks form. Increase speed to high and gradually add granulated sugar about 1 tbsp at a time until stiff peaks form. (The whites should be firm but moist.)
- Sift the confectioner’s sugar and cocoa powder over the egg whites and fold the dry ingredients into the white. (This looks like it will not happen. Fold gently and it will eventually come together.)Fill a pastry bag with the meringue. Pipe the meringue into whatever shapes you desire. Alternatively, you could just free form your shapes and level them a bit with the back of a spoon. (Class made rounds, hearts, diamonds and an attempt at a clover was made!).
- Bake for 2-3 hours until the meringues become dry and crisp. Cool and store in an airtight container 
for up to 3 days.

Chocolate Mascarpone Mousse (for the top of the Pavlova base):
1 ½ cups (355 mls) heavy cream (cream with a milk fat content of between 36 and 40 percent)
grated zest of 1 average sized lemon
9 ounces (255 grams) 72% chocolate, chopped
1 2/3 cups (390 mls) mascarpone
pinch of nutmeg
2 tbsp (30 mls) Grand Marnier (or orange juice)
- Put ½ cup (120 mls) of the heavy cream and the lemon zest in a saucepan over medium high heat. Once warm, add the chocolate and whisk until melted and smooth. Transfer the mixture to a bowl and let sit at room temperature until cool.
- Place the mascarpone, the remaining cup of cream and nutmeg in a bowl. Whip on low for a minute until the mascarpone is loose. Add the Grand Marnier and whip on medium speed until it holds soft peaks. (DO NOT OVERBEAT AS THE MASCARPONE WILL BREAK.).
- Mix about ¼ of the mascarpone mixture into the chocolate to lighten. Fold in the remaining mascarpone until well incorporated. Fill a pastry bag with the mousse. Again, you could just free form mousse on top of the pavlova.

Mascarpone Cream (for drizzling):
1 recipe crème anglaise
½ cup (120 mls) mascarpone
2 tbsp (30 mls) Sambucca (optional)
½ cup (120 mls) heavy cream
- Prepare the crème anglaise. Slowly whisk in the mascarpone and the Sambucca and let the mixture cool. Put the cream in a bowl and beat with electric mixer until very soft peaks are formed. Fold the cream into the mascarpone mixture.


bocconcini di pavlova

finger pavlova in a fish shaped spoon
for a summer dinner party


Crème Anglaise (a component of the Mascarpone Cream above):
1 cup (235 mls) whole milk
1 cup (235 mls) heavy cream
1 vanilla bean, split or 1 tsp pure vanilla extract
6 large egg yolks
6 tbsp (75 grams) sugar
- In a bowl, whisk together the egg yolks and sugar until the mixture turns pale yellow.
- Combine the milk, cream and vanilla in a saucepan over medium high heat, bringing the mixture to a boil. Take off the heat.
- Pour about ½ cup of the hot liquid into the yolk mixture, whisking constantly to keep from making scrambled eggs. Pour the yolk mixture into the pan with the remaining cream mixture and put the heat back on medium. Stir constantly with a wooden spoon until the mixture thickens enough to lightly coat the back of a wooden spoon. DO NOT OVERCOOK.
- Remove the mixture from the heat and strain it through a fine mesh sieve into a bowl. Cover and refrigerate until the mixture is thoroughly chilled, about 2 hours or overnight.


mini chocolate pavlova

Assembly the dessert:
Pipe the mousse onto the pavlovas and drizzle with the mascarpone cream over the top.
Dust with confectioner’s sugar and fresh fruit if desired.


pavlova up side down

some meringues crumbs on the bottom,
chocolate mascarpone mousse,
2 little meringues and a syruped cherry to garnish
(just boil cherries a few minutes in a little water with a little sugar and let cool)


This recipe goes to Haalo who's hosting Australia for the World Culinary ABC.


27 giugno 2010

Braised Figs - WHB # 239

la ricetta in italiano qui

Fig season is coming on, trees are plenty and in a short time they will be ready to eat and be preserved. But not only jam! Some years ago my dear friend Cristina taught me how to braise and store in jars for the winter season. Enjoy them with a cheese tray, a good combination to be appreciated.

fichi brasati - whb 239

You need:

1kg. figs
300 g. sugar
a no-sticky pan
small glass jars

- Gently clean figs with a kitchen cloth, pull off the stalk and cut in half.
- Fry in pan on high flame for 3/4 minutes, stirring with a wooden spoon so they won't stick. Add sugar and mix well.
- Cook the figs for 10/15 minutes stirring often gently.
- Remove from heat, pour into clean jars and cover with figs'caramel sauce.
- Close jars with lids, wrap in cloth and sterilize in water for 10 minutes from the boil. Let the jars in the water until cooled down.
- Cook a kilo of figs at a time, and remember to wash and dry the pan each new kilo to avooid that any caramel residual could burn and get the following preparation bitter.

fichi brasati


This recipe is my personal entry to WHB # 239 hosted by Chris from Mele Cotte
Thanks again to Haalo who manages greatfully all events,
Thanks again to Kalyn for her successfull idea!
WHB Rules

25 giugno 2010

Pink Newspaper for Pink Saturday

Hi everybody, it's my second time for Pink Saturday, a weekly event created and hosted by Beverly at How sweet the Sound, and would like to give you a little information about a popular pink Italian newspaper.


gazzetta dello sport

"Gazzetta dello Sport", is one of the major newspapers in Italy and the most popular about sports. It is a journal of news and detailed reports, written immediately after the conclusion of sporting events. It was just a lucky coincidence when the paper was edited just three days before the birth of the first modern Olympic Games, celebrated in Athens 6 to 15 April 1896. Opening ceremony report was one of the first articles. First editions were printed on light green paper, passing later to a yellow one following French style, and then trying white paper. But this last idea only lasted a month. On January 2nd, 1899 the final choice went to pink. The news was communicated to readers on December 27th, 1898 with a full-page title, the first one in the history of the newspaper. The new color made an immediate good impression and pink would soon be the symbol of the newspaper.
La Gazzetta dello Sport:
all the pink of life!

Well, today the first page is not so pink, the biggest title shows "All Black", because of our elimination in South Africa Football World Championships. I am not a fan of football, but living with 6 boys and a husband it's inevitable I follow their shouting echoes during the matches!

Happy to join Beverly again this week and Happy Pink Saturday to all!
... and don't forget to visit all Pinks ...

24 giugno 2010

Brownies ... for Sugar High Fridays # 67


Susan is hosting Sugar High Friday # 67, a montly current event created by Jennifer of the Domestic Goddess, asking to bake Bar Cookies, any kind of rectangular treats such as brownies, butterscotch-y blondies, or elaborately layered creations like Nanaimos, I had the pleasure to try for a Daring Bakers' Challenge last January.
I am glad to post this delicious recipe of a dear friend of mine, Annetta, who's been baking for years and still does every dinner or party she organizes, as all her friends are very fond of it!
A pleasant thin crust hiding an amazing soft heart that melts in your mouth ... mmmhhh, no words and eyes shut, please!

brownies annetta

You need:

4 eggs
200 g icing sugar
200 g dark chocolate 60/70%
1 teaspoon potato starch
1 teaspoon liquid vanilla
chopped nuts, optional

- In a stand mixer work egg yolks with sugar until very foamy.
- Add sifted potato starch and vanilla (and nuts if used).
- Add chocolate and butter (previously melted in a double boiler or microwave) and then cooled.
- Beat egg whites until stiff and carefully combine to the mixture.
- Grease with butter and flour a baking pan sizing 20x30 cm., pour the mixture, smooth well and bake at 180° for 40 minutes.

brownies annetta


Brownies ... che si sciolgono in bocca!

Un dolce veramente godurioso (ma tutto ciò che a base di cioccolata lo è per me): una fantastica crosticina che racchiude un cuore morbido che si scioglie in bocca.
La ricetta viene dalla mia amica Annetta, che lo propone da sempre alle sue cene e feste perchè va a ruba tra gli invitati, bisogna essere pronti con la mano ad afferrare il quadrotto spettante per non rimanere a bocca asciutta!


brownies annetta

Ingredienti:

4 uova
200 g di zucchero a velo
150 g di burro
200 g di cioccolato fondente al 60/70%
1 cucchiaino di fecola
1 cucchiaino di vaniglia liquida
(o una bustina di vanillina)
noci pezzettate, facoltative

- Montare i tuorli con lo zucchero a velo finchè ben spumosi.
- Aggiungere la fecola setacciata e la vaniglia (e le noci se scelte).
- Aggiungere il cioccolato e il burro precedentemente sciolti a bagnomaria o nel microonde e raffreddati.
- Montare gli albumi a neve e delicatamente incorporarli al composto.
- Ungere col burro e infarinare una teglia di 20x30 cm., versarci il composto, livellarlo bene e infornare a 180° per 40 minuti.

brownies annetta

20 giugno 2010

Ciliegie sciroppate e sotto grappa - WHB # 238


Ho avuto la fortuna quest'anno di trovare un contadino vicino a casa mia con dei bellissimi alberi di ciliegio, dove ho potuto rifornirmi alla grande e in economia: magnifiche cassette di ciliegie appena colte a solo 3eu al kilo!
Ho provato allora a farne qualche vasetto sciroppate, quest'inverno sarà una delizia poterle aggiungere alle macedonie festive, e qualche vasetto anche sotto grappa, per gli amanti dei gusti forti.

Ciliegie sciroppate

ciliegie sciroppate

ciliegie
sciroppo di zucchero al 20%
(1 litro di acqua e 200 g di zucchero)

- Sciogliere acqua e zucchero su fuoco moderato facendo bollire qualche minuto. Lasciare raffreddare completamente (io lo preparo la sera per la mattina dopo).
- Disporre le ciliegie ben lavate e asciugate e senza picciolo nei vasetti, schiacciandole leggermente con delicatezza per riempire bene gli spazi.
- Versare lo sciroppo fermandosi a un paio di centimetri dal bordo. Chiudere con i tappi, avvolgere in stracci e sterilizzare per 15 minuti dal bollore (l'acqua deve sempre coprire i vasetti). Lasciare raffreddare completamente in acqua e poi conservare in dispensa.

ciliegie sciroppate


Queste ricette partecipano al calendario di Ammodomio

Ciliegie sotto grappa

ciliegie
zucchero
grappa bianca

ciliegie sotto grappa

- Lavare ed asciugare le ciliegie. Tagliare il picciolo lasciandone un centimetro (altrimenti la grappa penetra dal foro e rende le ciliegie troppo forti).
- Disporle nei vasetti schiacciandole leggermente con delicatezza per riempire bene gli spazi, aggiungere un paio di cucchiai di zucchero a vasetto (meglio mettere il primo cucchiaio a metà vasetto e il secondo alla fine).
- Coprire con grappa, chiudere coi tappi e conservare in luogo fresco e buio.
- Nei primi giorni agitare i vasetti affinchè lo zucchero si sciolga bene.


This recipe is my personal entry to WHB # 238 hosted by Rachel from The Crispy Cook
Thanks again to Haalo who manages greatfully all events,
Thanks again to Kalyn for her successfull idea!
WHB Rules

This year I have been very lucky to find an organic farmer in the neighboroughs with beautiful cherry trees, so I could afford super boxes of freshly picked cherries for just 3 euros per kilo!
But not all the cherries were supposed to be eaten! Some of them have been preserved with syrup (and next winter will be a deliciousness in fruit salads) and some in grappa, for those lovers of stronger taste.

Cherries in syrup

cherries
20% sugar syrup
(1 liter water and 200 g sugar)

ciliegie sciroppate

- Dissolve sugar in water boiling on medium heat a few minutes. Allow to cool completely (overnight is better).
- Place cherries (well washed and dried and without stalk) in jars , crushing lightly to fill all spaces.
- Pour syrup up to 2 cm from the edge. Close with the lids, wrap in cloths and sterilize by boiling for 15 minutes (water should always cover the jars). Cool completely in water and then store in pantry.

ciliegie sciroppate

Cherries in grappa

cherries
sugar

- Wash and dry cherries. Cut the stalk, leaving less than an inch (otherwise grappa penetrates through the hole and makes the cherries too strong).
- Place in jars, gently pressing to fill all spaces, add a couple of tablespoons of sugar (better add the first spoon when half jar is filled, the second on top).
- Cover with grappa, close with the lids and store in a cool dark place.
- In the early days shake the jar so that sugar can melt.


11 giugno 2010

Pink Ladies Menu for Pink Saturday

I have been silently following Kay Ellen for a while, admiring her gorgeous pictures on the Flickr group Apparecchiamo! I belong to as well. She is very talented both in tablesetting than in photography, her album For the love of dishes is amazing, and zapping on the web I discovered Kay Ellen design and How sweet the Sound, where Beverly's carrying on a weekly appointment called Pink Saturday.

A few days ago I participated to Giulia's contest about preparing a nice dinner for two spending only 15 euros, not a cent more, and I think my Pink Ladies Menu could fit for the event.
I let myself be inspired by spring and the first blossoms in my garden, where pink is the most common color. Well, to tell you the truth, we had to wait such a long time this year to enjoy warm temperatures and sunny days, May has been an awful month indeed, but eventually Spring came along in all its beauty.
So, I planned a light and fresh menu, quite Pink, to share with a dear friend, quietly seated facing each other, sipping our welcome cocktail in front of a wonderful sunset I am so lucky to enjoy quite every night!

tramonto

Mise en place
mise en place
green runner by Ikea
mats by Solimene Pottery in Vietri
hand wash basins with rose petals and lemon slices

mise en place
floral decoration with variegated ivy,
flowers of cocktail rose, rose canina and pyracantha
napkin tied up with ivy and garnished with a cocktail rose

pink lady - aperitivo
Pink Lady

panzanella/fritto italiano/raita - antipasto
Crunchy Panzanella
Italian Fries
zucchini flower, a zucchini slice and a sage leaf
dipped in a batter made with flour and beer
Raita

arrosto di pesce - piatto principale
Roasted Salmon with Mashed Peas

minipie cioko lamponi - dolce
Chocolate Mini Pies with Fresh Cream and Raspberries
for the cream I just combined a little yougurt with a little mascarpone and some lime drops

Welcome to my table,
please have a seat and enjoy!

6 giugno 2010

Pink Ladies Menu per 2 a soli 15 eu!

Giulia scriveva che per preparare una bella cenetta da soddisfare il gourmet che c'è in ognuno di voi, dovevamo riuscire a scovare anche una mano

Sapiente per comporre un menù fresco e di stagione,
Prodiga per preparare una cena senza risparmiare la voglia e la fantasia,
Matta per saper decorare i piatti ed addobbare il tavolo,
ma soprattutto Avara che riuscisse a spendere … soltanto 15 euro!


Mi sono lasciata ispirare dalla primavera, anche se quest'anno ha tardato ad annunciarsi pienamente, dal rosa che secondo me è il colore che meglio la rappresenta, dai primi fiori in boccio nel mio giardino ... ed è nata questa cenetta leggera e fresca, tutta Pink, che mi piacerebbe condividere con un'amica, tranquillamente sedute una di fronte all'altra, sorseggiando il nostro cocktail di benvenuto davanti a un magnifico tramonto che il nostro bel lago sa regalarci ogni sera!


tramonto

Mise en Place
mise en place
runner verde prato Ikea
sottopiatti Ceramiche Solimene di Vietri
vaschette lavamani con petali di rosa e fettine di limone

mise en place
addobbo floreale con edera variegata,
rosa cocktail, rosa canina, fiorellini di pyracantha
tovagliolo legato con ederina e rosa cocktail

pink lady - aperitivo
Pink Lady

panzanella/fritto italiano/raita - antipasto
Panzanella croccante
Fritto italiano
(fiore di zucchina - zucchina - salvia)
una leggera impanatura in farina sciolta con un poco di birra
Raita

arrosto di pesce - piatto principale
Arrosto di salmone con puré di piselli

minipie cioko lamponi - dolce
Mini Pies di frolla al cioccolato con crema fresca e lamponi


ed ora ... occhio alla spesa:

conto spesa

Pink Lady 2,85
Antipasto 3,20
Salmone 5,30
Mini Pies 2,70

Totale 14,05 euro

Ho comprato il pesce all'Esselunga, dove, oltre ad essere buono e fresco (e pulito!), il merluzzo e le mazzancolle tropicali erano scontati rispettivamente del 30% e 40%. Ho trovato in offerta anche lo yogurt.
Allo spaccio Rana ho trovato in superofferta a 0, 50eu la pasta frolla al cioccolato (mai provata prima, e ne sono rimasta soddisfatta) e il mascarpone, perchè a scadenza breve. Basilico e salvia li offre generosamente il giardino, così come ogni fiore per le decorazioni.
Mi sono dimenticata di aggiungere in lista mezzo bicchiere di birra Radler della Lidl che ho usato per l'impanatura, ma sono pochi centesimi visto che costa 0,59 la lattina da mezzo litro, per cui la cifra totale non supera in ogni caso i 15 euro concessi.
Per le tartellette ho optato per una crema più semplice, limitandomi ad ammorbidire il mascarpone con un po' di yogurt, aromatizzando con qualche goccia di succo lime.


Benvenuti alla mia tavola, la cena è servita!

Template Design | Elque 2007